
TITLE
TEXT TO EXPLAIN THE FOLLOWING BLOG POSTS
Brown Sugar and Chia Steel Cut Oats
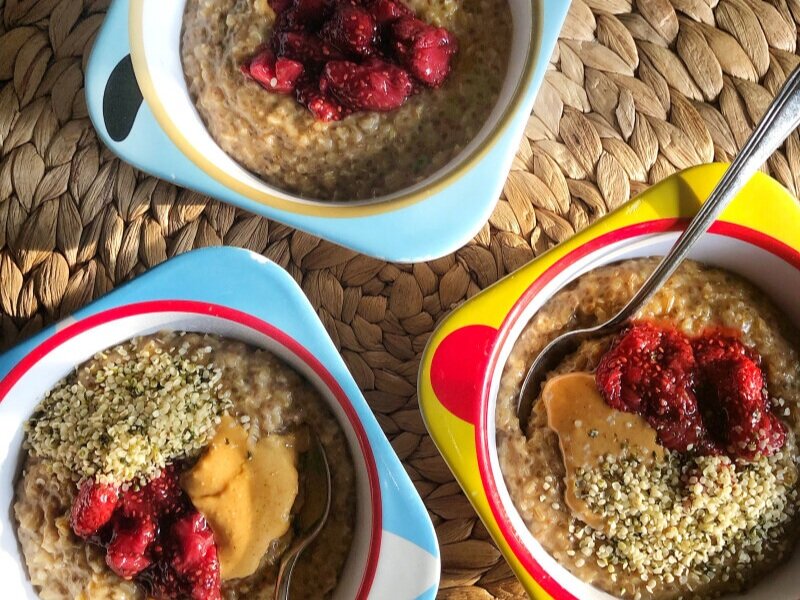
I’ve been making this oatmeal for Matthew since he first started spooning food into his own mouth. He’ll be five in February, which is proof it’s got some staying power when it comes to family meals.
My other boys liked oatmeal well enough, but not so much that I committed a specific recipe to memory like I have this one. They would eat it periodically, especially when the view out the dining room window looked more like the inside of a snow globe. My little guy is a bit different though, and instead to chooses to eat oatmeal whenever the opportunity presents itself, especially when it’s topped with creamy peanut butter and fruity jam.
What I like best about this breakfast is that it’s quick cooking and can easily be doubled or tripled to make extra for another day. Something I almost always do. I keep a lidded container full in the fridge and reheat it throughout the week. These types of recipes hold a lot of appeal to me these days, and when I realized I’ve NEVER shared this recipe anywhere before I thought it was high time you got in on this brilliant breakfast as well.
One thing I have to mention is that I make this with quick-cooking steel cut oats, not the regular kind. I like them best, as they’re kind of hybrid between the traditional kind and old-fashioned oats, giving you the best of both worlds in one bowl. I buy mine at Costco, but I’m certain they must exist elsewhere.
Brown Sugar and Chia Steel Cut Oats
1 tablespoon butter
1 cup quick-cooking steel cut oats
3 tablespoons chia seeds
2 to 4 tablespoons brown sugar, depending on desired sweetness
½ teaspoon cinnamon
Pinch salt
2 cups milk of choice (I like oat)
1 cup water
Toppings of choice: cream, milk, fruit, maple syrup, peanut butter, jam, etc.
1. Melt the butter in a medium saucepan set over medium heat. Add the oats and toss to combine, stirring them around the pot for a minute or two, or until they begin to toast and smell fragrant.
2. Quickly add the chia seeds, brown sugar, cinnamon and salt and stir well. Pour in the milk and water and stir to combine. Turn the heat up to medium-high and bring to a boil. Reduce the heat to medium-low and let simmer for 10 to 12 minutes, or until the liquid is absorbed and the oats are tender with a bit of bite, stirring intermittently. Spoon into bowls and finish with desired toppings.
Creamy Italian Chicken Noodle Soup

Hello, hello.
After a l-o-n-g hiatus, I’ve decided it might be time to return to blogging. I’m not even sure if blogging is a thing anymore (is it?), but I've missed it, and after almost twenty years of hands-on parenting I finally (finally!) have all of our kids in full-time school, leaving me with more free time than I’ve had in almost five years. So here I am.
I almost didn’t know what to do with myself last week after I left my Matthew at the fenced in Kindergarten doors. It took me a few days to recalibrate and get over sending one of the other boys away to school again (I can confirm that second year university drop off isn’t that much easier than first year), and now I feel like the house is cleaned and organized for the first time in years and I’m ready to see what’s next for me and my work.
I heard from plenty of you over on Instagram who shouted that what you really want to hear about first is the slow cooker chicken noodle soup I posted a picture of last week. It was wise of you all to unanimously request the recipe. This is one of the easiest dinners I’ve put on the table since school started, and it was a hit with everyone, especially this mom who now has a newly developed appreciation for crowd-pleasing, simple weeknight dinners. Despite having the time, I realize that I don’t want to spend as many hours making a Wednesday night dinner as I once did. I’m reserving those more adventurous meals for the weekends now, and I suspect you might feel the same way.
I hope you all enjoy this one. Let me know what you think!
Creamy Italian Chicken Noodle Soup
6 cups chicken broth
3 tablespoons pesto, plus extra for serving
5 (about 1 ¼ lbs.) boneless, skinless chicken thighs
1 cup fresh spinach finely chopped
1 red pepper, deseeded and finely diced
2 garlic cloves, grated or pressed
2 teaspoons dried oregano
1 teaspoon salt
½ teaspoon dried basil
1 cup 5% or 10% cream
1 tablespoons corn starch
4 cups dried pasta
Optional: grated Parmesan cheese, for serving
1. Place chicken stock, pesto, chicken thighs, spinach, red pepper, garlic, oregano, salt and basil in a 6-quart slow cooker and stir to combine. Cook on low for 6 hours, or until the chicken is cooked through.
2. Remove the chicken and transfer to a plate. Whisk together the cream and corn starch and add to the slow cooker. Shred the chicken with two forks and return to the slow cooker.
3. Meanwhile, cook the pasta according to the package directions, drain and set aside.
4. To serve, place a cup or so of the pasta in the bottom of a bowl and spoon the soup over top. Garnish with a dollop of pesto and freshly grated Parmesan cheese, if desired.
*You can cook the pasta directly in the slow cooker, if desired. I have done this but I’m not crazy about the texture of the pasta using this method. To be honest, I find it a little gummy. To give it a try, add the pasta to the slow cooker with the shredded chicken, turn the heat to high and cook for 15 to 20 minutes, or until the pasta has reached the desired doneness. Serves 6.*
Zucchini Parmesan Crusted Chicken

Anatomy of your new favourite weeknight meal…
5:00 p.m. – Put a teenager in charge of the toddler and pull the chicken from the fridge. Preheat the oven and line a sheet pan with parchment paper.
5:05 p.m. – Grate the zucchini over a clean tea towel; give it a good squeeze to drain any excess water. Grate the Parm. Combine both in a bowl. Referee argument between toddler and teen.
5:10 p.m. – Place chicken pieces on prepared pan and drizzle with oil. Salt the meat. Top with zucchini and Parm mixture. Add red pepper flakes, if desired.
5:13 p.m. – Set toddler up for colouring. Get teen to set the table. He’ll argue because it isn’t his week to do that chore, but his brother is having dinner with his girlfriend and isn’t home to do the job himself. Remind him that team work makes the dream (family dinner) work. Watch him roll his eyes so far back into his head you’re not sure if they’re ever return to their proper position. Place chicken in the oven.
5:15 p.m. – Make a few quick side dishes. It could be orzo with pesto, garlic bread, roasted baby fingerlings (throw them in the oven with the chicken), salad, steamed veggies, leftover rice, quinoa, quinoa salad…whatever can come together in less than 25 minutes.
5:20 p.m. – Let toddler reset the table because “he didn’t get to help!”
5:35 p.m. – Place side dishes on the table. Assign toddler to the job of cutting some lemons (best job in the world as far as he’s concerned). Get over the fact that each slice is mangled and full of seeds.
5:40 p.m. – Pull chicken from under the broiler and carry to the table. Watch the pieces disappear from the plates. Except the toddler’s. He’s decided that while he loved this dish last week, he really hates it tonight. The beans and potatoes apparently aren’t cutting it either, so he excuses himself/screams his way down from the table and lies on the floor with the dog while the rest of us devour our dinner.
Zucchini Parmesan Crusted Chicken
6 to 8 boneless skinless chicken thighs (about 1 ½ lbs.)
Olive oil
Kosher salt
1 cup grated Parmesan cheese
1 cup grated zucchini, squeezed and drained
Crushed red pepper flakes (optional)
Lemon wedge (optional)
1. Preheat the oven to 400°F and line a rimmed sheet pan with parchment paper.
2. Place the chicken thighs on the prepared pan and drizzle with olive oil. Season lightly with kosher salt.
3. In a small bowl, stir together the Parmesan cheese and zucchini with a fork. Top each piece of chicken with a thick layer of the zucchini mixture and sprinkle with red pepper flakes, if using.
4. Bake for 20 to 25 minutes, or until the chicken is cooked through. Turn the oven to broil, and bake for an additional 2 minutes. The top of the chicken should be golden brown. Serve the chicken at once with a lemon wedge.
*The size of the chicken thighs will determine whether you need 6 or 8 for this recipe. If you go by weight, you’ll require roughly 1 ½ pounds of meat. Feel free to use chicken breasts instead, if that’s your preference, though I would suggest you slice the pieces in half through the equator to make them thinner (alternatively, you can pound them out with a meal mallet but I’m far too lazy to do such a thing). Also, please do not use Parmesan cheese from a can for this recipe; you’re definitely looking to use the real stuff here.*
Beef, Bean and Pumpkin Chili

If you recall, we are Halloween enthusiasts, and it’s a bit of a gut punch to know that my main costume conspirators are too old to collaborate on outfits anymore. When I started writing this blog, we were in the thick of the dress up days, and while I do know they’ll come around again with Matthew, I miss the chaos the comes with getting the older boys ready for candy collecting.
On Saturday night I did help Ben DIY a last-minute look for a Halloween party - the kind that was more likely to serve beer than Mr. Big bars - and I grabbed a box of our favourite fun size treats for our near-nightly episodes of Stranger Things this week, proving to myself that Halloween is still fun these days despite being different. Of course, I haven’t forgot about the fire-breathing, taco-eating dragon that lives here. He’s venturing out tonight with two older brothers and a girlfriend in tow, and while I expect that we’ll be wandering the streets for no more than 20 minutes, it’s exciting in its own way, too.
The one thing that hasn’t changed about our Halloweens is the big pot of beef, bean and pumpkin chili that we devour before the candy collecting commences. Part of me has always hoped the meat and beans would fill up the kids enough that they don’t feel like consuming too many Mars bars (no such luck), while the other part makes this strictly for the adults in need of enough sustenance to enjoy another year of trick or treating. I almost always make this a day in advance, a cooking technique that should really be applied to all chilis, and while it reheats and the kids chill out, I prep a bunch of toppings to make it a meal everyone gets excited about.
Obviously, this recipe shouldn’t be strictly reserved for Halloween night. I make it all fall long, especially when I bake with pumpkin and end up with cup or so of leftover purée. I’ve even been known to make a batch on Sunday – it’s a super quick-cooking chili – and portion it into lidded containers for a week’s worth of high school lunches. A classic chili with a twist should be a staple in everyone’s regular recipe repertoire.
Beef, Bean and Pumpkin Chili
1 tablespoon olive oil
1 lb. ground beef
1 medium onion, finely chopped
2 tablespoons chili powder
1 tablespoon dried oregano
1 ½ teaspoons ground cumin
1 ½ teaspoon kosher salt
½ teaspoon freshly ground black pepper
2 cans (540 mL each) red kidney beans
1 can (796 mL) crushed or diced tomatoes
1 cup pumpkin pureé
1 cup beef stock, beer or water
1. Heat the oil in a Dutch oven set over medium-high heat. Add the beef and cook, stirring often and using a wooden spoon to break up the meat, until no longer pink, about 3 minutes. Add the onions; cook for an additional 2 minutes.
2. Sprinkle with chili powder, oregano, cumin, salt and pepper. Stir to combine. Add the beans, tomatoes, pumpkin and beef stock and bring to a low boil, stirring often.
3. Reduce heat and simmer for 30 to 60 minutes, stirring occasionally. Check seasonings and adjust, if desired. Serve hot.
Chicken Enchiladas

At the rate I’m going, I should probably consider renaming this blog “101 ways to cook chicken for dinner.” I don’t usually post two recipes for the same ingredient back-to-back like this, but there was so much interest in this super simple enchilada dinner I shared on Instagram last week, it felt negligent not to point you all in the direction of the recipe.
My family is cray-cray for this meal. Well, not the toddler, but he’s in an anti-sauce-meat-almost-everything phase right now, so we can all agree that for this particular dinner his opinion doesn’t count. If your kids are on board with Mexican flavours, chicken and cheese, I think they’ll be down with this dish.
The best part about this meal is that the simmering of the chicken yields the most flavourful enchilada sauce and no packaged or prepared ingredients are required. The method might look a little lengthy, but it couldn’t be simpler, I promise. I like to use corn tortillas, but the flour ones work just as well. I’ve tried making it with both and can confirm that the difference is nothing more than a matter of taste.
Chicken Enchiladas
2 teaspoons canola oil
1 medium onion, finely chopped
1 jalapeno pepper, seeded and finely chopped
½ teaspoon kosher salt
3 garlic cloves, minced or grated
2 tablespoons chili powder
2 teaspoons ground cumin
1 tablespoon granulated or cane sugar
1 (398 mL) can Hunt’s Heirloom Crushed or Diced Tomatoes or 2 cups tomato sauce
1 cup water or chicken stock
1 ½ lbs. boneless, skinless chicken breasts or thighs
10 corn or flour tortillas (6-inch)
1 cup shredded cheddar cheese
1 cup shredded Monterrey Jack cheese
1 tablespoons olive oil
In a large saucepan, combine the oil, onion, jalapeno and salt. Cook over medium heat, stirring often, until the onions and pepper have softened, about 8 to 10 minutes. Stir in the garlic, chili powder, cumin and sugar, and cook until fragrant, less than 30 seconds. Stir in the tomato sauce and water. Bring to a simmer.
Nestle the chicken into the sauce. Reduce heat to low, cover, and cook until chicken is cooked through, about 12 to 20 minutes, depending on the size and thickness of the chicken breasts you are using.
Meanwhile, preheat the oven to 300°F and brush both sides of the tortillas with olive oil. Place in a single layer on two baking sheets lined with parchment paper. Bake for 3 to 4 minutes or until soft and foldable. Set aside. If making the enchiladas now, increase the heat to 400°F. If freezing the enchiladas turn the oven off (see below for more details).
Transfer the chicken to a plate and set aside to cool. Continue to simmer the sauce over medium heat until slightly thickened, about 5 minutes. Strain the sauce through a fine mesh sieve into a medium bowl, pressing the onion mixture to extract as much liquid as possible. Season sauce with additional salt and pepper to taste.
Transfer the leftover onion mixture from the strainer to a large bowl and set aside. Shred the chicken into bite-sized pieces and also add to the bowl. Stir in ¼ cup of the enchilada sauce, and half a cup each of the cheddar and Monterrey Jack cheeses. Toss to combine.
Spread the tortillas on a clean work surface, and spoon 1/3 cup of the chicken mixture evenly down the center of each. Tightly roll each tortilla and lay seam-side down in a greased 9×13-inch baking dish.
To Make it Now: Brush the enchiladas with the olive oil and bake for 12 to 15 minutes or until the tops are lightly golden. Pour the remaining enchilada sauce evenly over the top and sprinkle with the remaining cheeses. Cover dish with foil and bake 15 to 20 minutes longer, or until heated through. Remove foil and bake another 5 minutes, until cheese browns. Remove from oven and let stand 10 minutes. Sprinkle with garnishes before serving.
To Make it a Freezer Meal: Wrap the pan of enchiladas tightly with plastic wrap, pressing down to remove the air. Cover with foil. Pour the remaining enchilada sauce into a freezer bag and seal, removing as much air as possible. Place the remaining cheese in a second freezer bag and seal, also removing as much as possible. Place the freezer bags on top of the pan and wrap once again in a layer of foil. Label and freeze. To cook from frozen, following instructions above. Thaw the enchilada sauce by running the freezer bag under hot water or microwave in a microwave-safe bowl for 1 to 2 minutes. Break up the frozen cheese with your hands and scatter over the enchiladas. Add an extra five minutes to the second bake time and proceed with the recipe as written.
*Optional garnishes and toppings: fresh cilantro, sliced avocado, crumbled queso or feta, sour cream*