
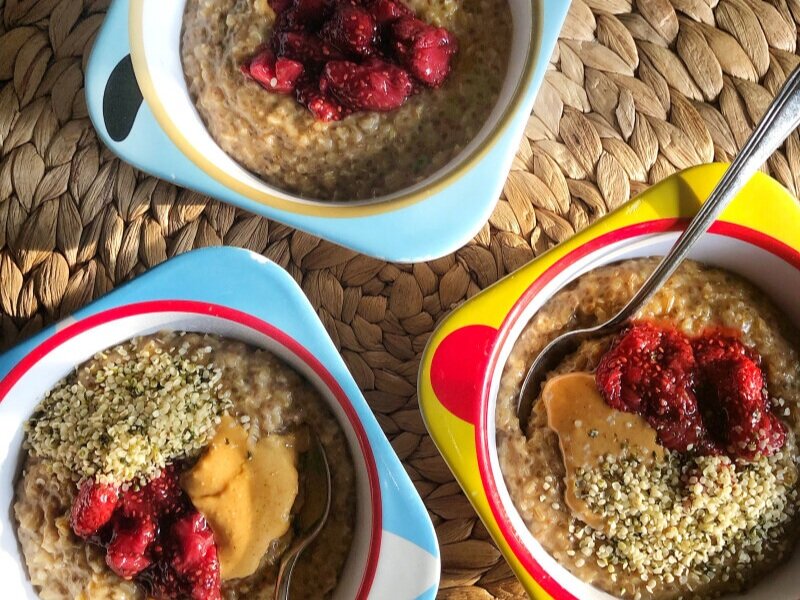
BROWN SUGAR AND STEEL-CUT OATS
I’ve been making this oatmeal for Matthew since he first started spooning food into his own mouth. He’ll be five in February, which is proof it’s got some staying power when it comes to family meals.
My other boys liked oatmeal well enough, but not so much that I committed a specific recipe to memory like I have this one. They would eat it periodically, especially when the view out the dining room window looked more like the inside of a snow globe. My little guy is a bit different though, and instead to chooses to eat oatmeal whenever the opportunity presents itself, especially when it’s topped with creamy peanut butter and fruity jam.
What I like best about this breakfast is that it’s quick cooking and can easily be doubled or tripled to make extra for another day. Something I almost always do. I keep a lidded container full in the fridge and reheat it throughout the week. These types of recipes hold a lot of appeal to me these days, and when I realized I’ve NEVER shared this recipe anywhere before I thought it was high time you got in on this brilliant breakfast as well.
One thing I have to mention is that I make this with quick-cooking steel cut oats, not the regular kind. I like them best, as they’re kind of hybrid between the traditional kind and old-fashioned oats, giving you the best of both worlds in one bowl. I buy mine at Costco, but I’m certain they must exist elsewhere.
Brown Sugar and Chia Steel Cut Oats
1 tablespoon butter
1 cup quick-cooking steel cut oats
3 tablespoons chia seeds
2 to 4 tablespoons brown sugar, depending on desired sweetness
½ teaspoon cinnamon
Pinch salt
2 cups milk of choice (I like oat)
1 cup water
Toppings of choice: cream, milk, fruit, maple syrup, peanut butter, jam, etc.
1. Melt the butter in a medium saucepan set over medium heat. Add the oats and toss to combine, stirring them around the pot for a minute or two, or until they begin to toast and smell fragrant.
2. Quickly add the chia seeds, brown sugar, cinnamon and salt and stir well. Pour in the milk and water and stir to combine. Turn the heat up to medium-high and bring to a boil. Reduce the heat to medium-low and let simmer for 10 to 12 minutes, or until the liquid is absorbed and the oats are tender with a bit of bite, stirring intermittently. Spoon into bowls and finish with desired toppings.
Creamy Italian Chicken Noodle Soup

Hello, hello.
After a l-o-n-g hiatus, I’ve decided it might be time to return to blogging. I’m not even sure if blogging is a thing anymore (is it?), but I've missed it, and after almost twenty years of hands-on parenting I finally (finally!) have all of our kids in full-time school, leaving me with more free time than I’ve had in almost five years. So here I am.
I almost didn’t know what to do with myself last week after I left my Matthew at the fenced in Kindergarten doors. It took me a few days to recalibrate and get over sending one of the other boys away to school again (I can confirm that second year university drop off isn’t that much easier than first year), and now I feel like the house is cleaned and organized for the first time in years and I’m ready to see what’s next for me and my work.
I heard from plenty of you over on Instagram who shouted that what you really want to hear about first is the slow cooker chicken noodle soup I posted a picture of last week. It was wise of you all to unanimously request the recipe. This is one of the easiest dinners I’ve put on the table since school started, and it was a hit with everyone, especially this mom who now has a newly developed appreciation for crowd-pleasing, simple weeknight dinners. Despite having the time, I realize that I don’t want to spend as many hours making a Wednesday night dinner as I once did. I’m reserving those more adventurous meals for the weekends now, and I suspect you might feel the same way.
I hope you all enjoy this one. Let me know what you think!
Creamy Italian Chicken Noodle Soup
6 cups chicken broth
3 tablespoons pesto, plus extra for serving
5 (about 1 ¼ lbs.) boneless, skinless chicken thighs
1 cup fresh spinach finely chopped
1 red pepper, deseeded and finely diced
2 garlic cloves, grated or pressed
2 teaspoons dried oregano
1 teaspoon salt
½ teaspoon dried basil
1 cup 5% or 10% cream
1 tablespoons corn starch
4 cups dried pasta
Optional: grated Parmesan cheese, for serving
1. Place chicken stock, pesto, chicken thighs, spinach, red pepper, garlic, oregano, salt and basil in a 6-quart slow cooker and stir to combine. Cook on low for 6 hours, or until the chicken is cooked through.
2. Remove the chicken and transfer to a plate. Whisk together the cream and corn starch and add to the slow cooker. Shred the chicken with two forks and return to the slow cooker.
3. Meanwhile, cook the pasta according to the package directions, drain and set aside.
4. To serve, place a cup or so of the pasta in the bottom of a bowl and spoon the soup over top. Garnish with a dollop of pesto and freshly grated Parmesan cheese, if desired.
*You can cook the pasta directly in the slow cooker, if desired. I have done this but I’m not crazy about the texture of the pasta using this method. To be honest, I find it a little gummy. To give it a try, add the pasta to the slow cooker with the shredded chicken, turn the heat to high and cook for 15 to 20 minutes, or until the pasta has reached the desired doneness. Serves 6.*
Zucchini Parmesan Crusted Chicken

Anatomy of your new favourite weeknight meal…
5:00 p.m. – Put a teenager in charge of the toddler and pull the chicken from the fridge. Preheat the oven and line a sheet pan with parchment paper.
5:05 p.m. – Grate the zucchini over a clean tea towel; give it a good squeeze to drain any excess water. Grate the Parm. Combine both in a bowl. Referee argument between toddler and teen.
5:10 p.m. – Place chicken pieces on prepared pan and drizzle with oil. Salt the meat. Top with zucchini and Parm mixture. Add red pepper flakes, if desired.
5:13 p.m. – Set toddler up for colouring. Get teen to set the table. He’ll argue because it isn’t his week to do that chore, but his brother is having dinner with his girlfriend and isn’t home to do the job himself. Remind him that team work makes the dream (family dinner) work. Watch him roll his eyes so far back into his head you’re not sure if they’re ever return to their proper position. Place chicken in the oven.
5:15 p.m. – Make a few quick side dishes. It could be orzo with pesto, garlic bread, roasted baby fingerlings (throw them in the oven with the chicken), salad, steamed veggies, leftover rice, quinoa, quinoa salad…whatever can come together in less than 25 minutes.
5:20 p.m. – Let toddler reset the table because “he didn’t get to help!”
5:35 p.m. – Place side dishes on the table. Assign toddler to the job of cutting some lemons (best job in the world as far as he’s concerned). Get over the fact that each slice is mangled and full of seeds.
5:40 p.m. – Pull chicken from under the broiler and carry to the table. Watch the pieces disappear from the plates. Except the toddler’s. He’s decided that while he loved this dish last week, he really hates it tonight. The beans and potatoes apparently aren’t cutting it either, so he excuses himself/screams his way down from the table and lies on the floor with the dog while the rest of us devour our dinner.
Zucchini Parmesan Crusted Chicken
6 to 8 boneless skinless chicken thighs (about 1 ½ lbs.)
Olive oil
Kosher salt
1 cup grated Parmesan cheese
1 cup grated zucchini, squeezed and drained
Crushed red pepper flakes (optional)
Lemon wedge (optional)
1. Preheat the oven to 400°F and line a rimmed sheet pan with parchment paper.
2. Place the chicken thighs on the prepared pan and drizzle with olive oil. Season lightly with kosher salt.
3. In a small bowl, stir together the Parmesan cheese and zucchini with a fork. Top each piece of chicken with a thick layer of the zucchini mixture and sprinkle with red pepper flakes, if using.
4. Bake for 20 to 25 minutes, or until the chicken is cooked through. Turn the oven to broil, and bake for an additional 2 minutes. The top of the chicken should be golden brown. Serve the chicken at once with a lemon wedge.
*The size of the chicken thighs will determine whether you need 6 or 8 for this recipe. If you go by weight, you’ll require roughly 1 ½ pounds of meat. Feel free to use chicken breasts instead, if that’s your preference, though I would suggest you slice the pieces in half through the equator to make them thinner (alternatively, you can pound them out with a meal mallet but I’m far too lazy to do such a thing). Also, please do not use Parmesan cheese from a can for this recipe; you’re definitely looking to use the real stuff here.*
Beef, Bean and Pumpkin Chili

If you recall, we are Halloween enthusiasts, and it’s a bit of a gut punch to know that my main costume conspirators are too old to collaborate on outfits anymore. When I started writing this blog, we were in the thick of the dress up days, and while I do know they’ll come around again with Matthew, I miss the chaos the comes with getting the older boys ready for candy collecting.
On Saturday night I did help Ben DIY a last-minute look for a Halloween party - the kind that was more likely to serve beer than Mr. Big bars - and I grabbed a box of our favourite fun size treats for our near-nightly episodes of Stranger Things this week, proving to myself that Halloween is still fun these days despite being different. Of course, I haven’t forgot about the fire-breathing, taco-eating dragon that lives here. He’s venturing out tonight with two older brothers and a girlfriend in tow, and while I expect that we’ll be wandering the streets for no more than 20 minutes, it’s exciting in its own way, too.
The one thing that hasn’t changed about our Halloweens is the big pot of beef, bean and pumpkin chili that we devour before the candy collecting commences. Part of me has always hoped the meat and beans would fill up the kids enough that they don’t feel like consuming too many Mars bars (no such luck), while the other part makes this strictly for the adults in need of enough sustenance to enjoy another year of trick or treating. I almost always make this a day in advance, a cooking technique that should really be applied to all chilis, and while it reheats and the kids chill out, I prep a bunch of toppings to make it a meal everyone gets excited about.
Obviously, this recipe shouldn’t be strictly reserved for Halloween night. I make it all fall long, especially when I bake with pumpkin and end up with cup or so of leftover purée. I’ve even been known to make a batch on Sunday – it’s a super quick-cooking chili – and portion it into lidded containers for a week’s worth of high school lunches. A classic chili with a twist should be a staple in everyone’s regular recipe repertoire.
Beef, Bean and Pumpkin Chili
1 tablespoon olive oil
1 lb. ground beef
1 medium onion, finely chopped
2 tablespoons chili powder
1 tablespoon dried oregano
1 ½ teaspoons ground cumin
1 ½ teaspoon kosher salt
½ teaspoon freshly ground black pepper
2 cans (540 mL each) red kidney beans
1 can (796 mL) crushed or diced tomatoes
1 cup pumpkin pureé
1 cup beef stock, beer or water
1. Heat the oil in a Dutch oven set over medium-high heat. Add the beef and cook, stirring often and using a wooden spoon to break up the meat, until no longer pink, about 3 minutes. Add the onions; cook for an additional 2 minutes.
2. Sprinkle with chili powder, oregano, cumin, salt and pepper. Stir to combine. Add the beans, tomatoes, pumpkin and beef stock and bring to a low boil, stirring often.
3. Reduce heat and simmer for 30 to 60 minutes, stirring occasionally. Check seasonings and adjust, if desired. Serve hot.
Chicken Enchiladas

At the rate I’m going, I should probably consider renaming this blog “101 ways to cook chicken for dinner.” I don’t usually post two recipes for the same ingredient back-to-back like this, but there was so much interest in this super simple enchilada dinner I shared on Instagram last week, it felt negligent not to point you all in the direction of the recipe.
My family is cray-cray for this meal. Well, not the toddler, but he’s in an anti-sauce-meat-almost-everything phase right now, so we can all agree that for this particular dinner his opinion doesn’t count. If your kids are on board with Mexican flavours, chicken and cheese, I think they’ll be down with this dish.
The best part about this meal is that the simmering of the chicken yields the most flavourful enchilada sauce and no packaged or prepared ingredients are required. The method might look a little lengthy, but it couldn’t be simpler, I promise. I like to use corn tortillas, but the flour ones work just as well. I’ve tried making it with both and can confirm that the difference is nothing more than a matter of taste.
Chicken Enchiladas
2 teaspoons canola oil
1 medium onion, finely chopped
1 jalapeno pepper, seeded and finely chopped
½ teaspoon kosher salt
3 garlic cloves, minced or grated
2 tablespoons chili powder
2 teaspoons ground cumin
1 tablespoon granulated or cane sugar
1 (398 mL) can Hunt’s Heirloom Crushed or Diced Tomatoes or 2 cups tomato sauce
1 cup water or chicken stock
1 ½ lbs. boneless, skinless chicken breasts or thighs
10 corn or flour tortillas (6-inch)
1 cup shredded cheddar cheese
1 cup shredded Monterrey Jack cheese
1 tablespoons olive oil
In a large saucepan, combine the oil, onion, jalapeno and salt. Cook over medium heat, stirring often, until the onions and pepper have softened, about 8 to 10 minutes. Stir in the garlic, chili powder, cumin and sugar, and cook until fragrant, less than 30 seconds. Stir in the tomato sauce and water. Bring to a simmer.
Nestle the chicken into the sauce. Reduce heat to low, cover, and cook until chicken is cooked through, about 12 to 20 minutes, depending on the size and thickness of the chicken breasts you are using.
Meanwhile, preheat the oven to 300°F and brush both sides of the tortillas with olive oil. Place in a single layer on two baking sheets lined with parchment paper. Bake for 3 to 4 minutes or until soft and foldable. Set aside. If making the enchiladas now, increase the heat to 400°F. If freezing the enchiladas turn the oven off (see below for more details).
Transfer the chicken to a plate and set aside to cool. Continue to simmer the sauce over medium heat until slightly thickened, about 5 minutes. Strain the sauce through a fine mesh sieve into a medium bowl, pressing the onion mixture to extract as much liquid as possible. Season sauce with additional salt and pepper to taste.
Transfer the leftover onion mixture from the strainer to a large bowl and set aside. Shred the chicken into bite-sized pieces and also add to the bowl. Stir in ¼ cup of the enchilada sauce, and half a cup each of the cheddar and Monterrey Jack cheeses. Toss to combine.
Spread the tortillas on a clean work surface, and spoon 1/3 cup of the chicken mixture evenly down the center of each. Tightly roll each tortilla and lay seam-side down in a greased 9×13-inch baking dish.
To Make it Now: Brush the enchiladas with the olive oil and bake for 12 to 15 minutes or until the tops are lightly golden. Pour the remaining enchilada sauce evenly over the top and sprinkle with the remaining cheeses. Cover dish with foil and bake 15 to 20 minutes longer, or until heated through. Remove foil and bake another 5 minutes, until cheese browns. Remove from oven and let stand 10 minutes. Sprinkle with garnishes before serving.
To Make it a Freezer Meal: Wrap the pan of enchiladas tightly with plastic wrap, pressing down to remove the air. Cover with foil. Pour the remaining enchilada sauce into a freezer bag and seal, removing as much air as possible. Place the remaining cheese in a second freezer bag and seal, also removing as much as possible. Place the freezer bags on top of the pan and wrap once again in a layer of foil. Label and freeze. To cook from frozen, following instructions above. Thaw the enchilada sauce by running the freezer bag under hot water or microwave in a microwave-safe bowl for 1 to 2 minutes. Break up the frozen cheese with your hands and scatter over the enchiladas. Add an extra five minutes to the second bake time and proceed with the recipe as written.
*Optional garnishes and toppings: fresh cilantro, sliced avocado, crumbled queso or feta, sour cream*
CORN AND ZUCCHINI RISOTTO, TWO WAYS

I’ve seen a lot of “what’s saving my life” type of articles floating around the internet this summer, so I thought I would play along. Here’s a look at what I’m feeling an immense amount of gratitude for these days:
Books: On January 1st, I set an arbitrary goal to read 50 books this year. I’m on book 32 at the moment and feel hopeful that I’ll hit my target. Some of my favourites: Educated; Girl, Wash Your Face; The Wedding Date; It Ends with Us; Beartown; An American Marriage; The Kiss Quotient.
Tissue: Ben leaves for University on Saturday. There really isn’t anything more to say about that other than this: who knew that successfully achieving a goal (loving, caring for and nurturing a child from infancy through to young adulthood before launching them into the next stage of life) could leave you so dang sad and heartbroken? Also, a PSA: if your toddler is a huge Buzz and Woody fan AND you have a child moving away to University in five days DO NOT watch Toy Story 3 this week. Just sayin’.
Orange Le Croix and Aperol: Most days I’m too tired or too lazy to make a proper Aperol spritz, so my weeknight cheat is to grab a large glass and fill it with ice, orange flavoured La Croix, and a generous splash of Aperol. I know “spritzing” is all the rage this summer, but I like to think of my variation as the one that worn out moms are drinking. During the day, I like to mix the aforementioned water with this tea, which I buy from Costco.
This Soundtrack: I know it’s from a Christmas movie – only three more months until they start airing again - but this is my favourite working/cooking/writing background music. It’s also perfect for a dinner party or when you’re having drinks with friends.
The Instant Pot: I know this electric pressure cooker has its critics, but I’m an unapologetic fan. Risotto in six to ten minutes? Perfect brown rice in less than 25? Soup that tastes as though it’s been simmering on the stove all day? A whole frozen chicken cooked in less than an hour? Call me crazy, but this machine has a permanent place in my kitchen and has made getting dinner on the table a cinch this summer, despite demanding jobs, a cranky toddler, and hungry/working teenagers.
What's saving your life these days? I'd love to hear.
Corn and Zucchini Risotto (Pressure Cooker Variation)
4 ½ cups water
2 cups fresh or frozen corn kernels, divided
3 tablespoons olive oil
1 medium zucchini, grated
2 cloves garlic, grated or pressed
1 medium onion, finely chopped
2 cups Arborio rice
½ cup white wine
Generous pinch of salt
2 tablespoons butter
½ cup freshly grated Parmesan cheese
1. Combine water and 1 cup corn in a blender and process until smooth, about 1 minute. Pour through a fine mesh sieve into a large glass measuring cup and discard the solids. If the liquid doesn’t measure 4 ½ cups, add additional water until it does. Set aside.
2. Pour the olive oil into the bottom of a pressure cooker and turn on the sauté function. When the oil is hot, add the grated zucchini and chopped onion, and sauté until the onion is soft and almost translucent, about 4 minutes. Add in the chopped garlic and sauté for an additional 30 seconds. If the pot seems too hot turn it off for a minute or so in order to avoid burning the vegetables.
3. Pour in the rice and stir continuously until it becomes translucent around the edges, about 2 minutes. Add the wine and salt, stir and cook until the liquid evaporates.
4. Add the corn stock and stir. Turn off the sauté function and turn on the manual setting. Set to high for six minutes and secure the lid in place. When the time is up, do a quick release. Remove the lid and set aside. The risotto will look soupy. Stir thoroughly and let it sit for one minute. Stir in remaining corn, butter and parmesan. Taste and season with extra salt, if desired. Serve at once.
Corn and Zucchini Risotto (Dutch Oven Variation)
4 ½ cups water
2 cups fresh or frozen corn kernels, divided
3 tablespoons olive oil
1 medium zucchini, grated
2 cloves garlic, grated or pressed
1 medium onion, finely chopped
1 cup Arborio rice
½ cup white wine
Generous pinch of salt
2 tablespoons butter
½ cup freshly grated Parmesan cheese
1. Combine water and 1 cup corn in a blender and process until smooth, about 1 minute. Pour through a fine mesh sieve into a large glass measuring cup and discard the solids. If the liquid doesn’t measure 4 ½ cups, add additional water until it does. Transfer to a pot and bring to a simmer over medium-high heat. Reduce heat to low.
2. Heat olive oil in a medium Dutch oven. Add zucchini and onion and cook, stirring often, until the onions are soft and translucent, 4 to 5 minutes. Add in the chopped garlic and sauté for an additional 30 seconds.
3. Pour in the rice and stir continuously until the rice becomes translucent around the edges, about 2 minutes. Add in the wine and salt, stir and cook until the liquid evaporates.
4. Stir in 2 cups of the corn stock, reduce heat to medium-low and cook, stirring often, until the broth is mostly absorbed. Add 1 cup of stock and cook, stirring often, for 5 minutes. Repeat with 1 more cup of corn stock. Remove from heat and stir in ½ cup stock, remaining corn, butter and Parmesan. Taste and season with extra salt, if desired. Serve at once.
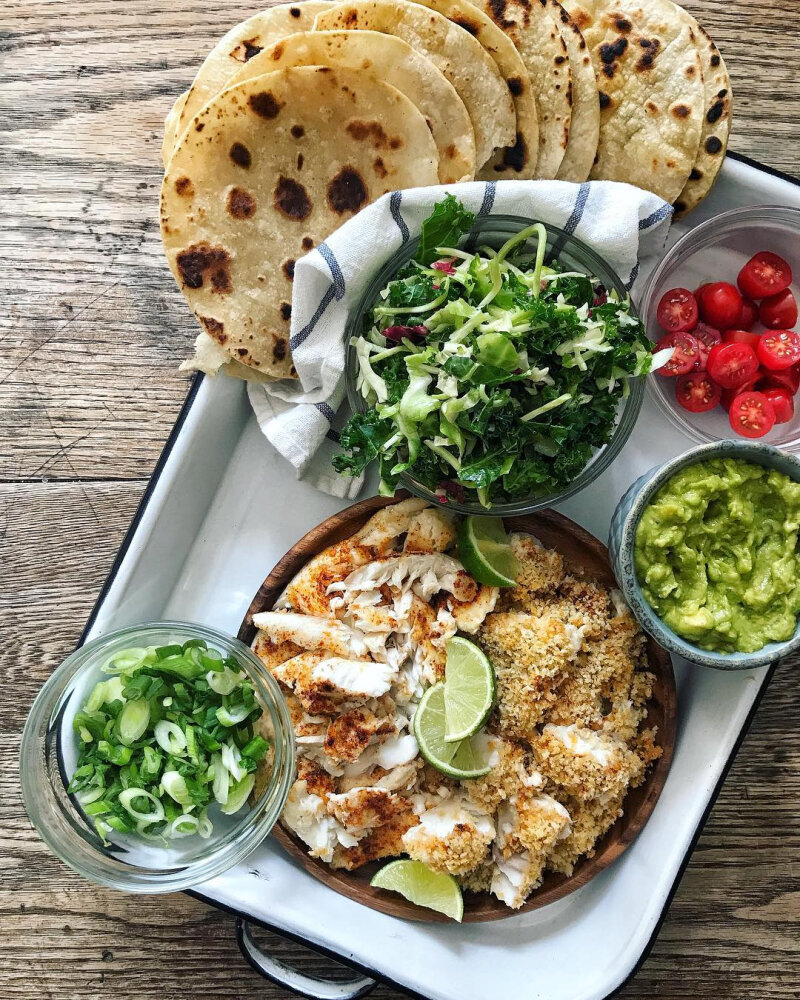
roasted fish tacos

Long-time readers already know I’m not much of a summer lover (it’s my fourth favourite season, after all), but this year I have a plan to make it the happiest one yet. I’m arming myself with a few strategies to keep us cool and content during the coming months, and have lists upon lists of ideas, recipes, books, movies and bucket list wishes to keep the kids (who range in age from 3 to 18) happy over the next two months.
First in the lineup is knowing how to make roasted fish tacos. I’m teaching everyone I know this simple, simple dinner recipe (including my own kids), because a) it’s delicious b) it’s quick and easy c) you can rely on several store-bought shortcuts if that’s your jam to make this meal even easier to put together and d) it’s just as easy to make for two people as it is for ten.
The list of ingredients is quite concise. You’ll need:
Fish (we love salmon, but white fish works just as well)
Slaw (you can make your own or you can buy a pack of kale slaw - readily available at most grocery stores and Costco. If you buy it – hey, why not? – trash the accompanying dressing and douse the veggies with a generous splash of olive oil, white wine vinegar and salt instead)
Guacamole (homemade or store-bought) or mashed avocado
Lime wedges
Chopped tomatoes
Sliced green onions
Corn tortilla (but wheat ones also work if that’s what you prefer)
To make the tacos, do the following:
1. Drizzle the fish with olive oil and lime juice. You can add lime zest as well, if you like. Then sprinkle with salt, chili powder and cumin. Roast at 400°F for 10 to 15 minutes, depending on the size of the fish.
2. While the fish is in the oven, assemble/make the slaw and guacamole, and warm the tortillas (I do mine in a dry skillet, so they get golden and crispy). Chop the tomatoes and green onions.
3. Place the tortillas in a clean dish towel to keep them warm. Flake the fish and pile it onto a plate. Serve with bowls of slaw, guacamole, lime wedges, chopped tomatoes and sliced green onions. Feel free to add some tortilla chips and salsa on the side.
Here’s to having a happier, tastier summer, friends.
pumpkin spice bundt cake with maple glaze

This was supposed to be a blog post about molasses oatmeal rye rolls, but instead you're getting a recipe for a pumpkin spice bundt cake with maple glaze. It couldn't be easier to make, is just as suitable on a holiday dessert table as it is served for weekend tea, and is both classic and completely comforting. I dare say we’ve never needed comfort food more than we have in the past four weeks, and at a time that’s filled with plenty of challenging days, the silver lining is that this is the right season for such meals.
Rob’s dad has been in the ICU for 31 days, and while he’s made several steps forward in the right direction, there have also been a few setbacks that left us wondering what the next day would bring. We honestly weren't sure which direction things were going to go, and while we've tried to keep some sense of normalcy at home for the past month for the kids, with daily trips to the hospital and the heavy hearts we were carrying, it’s certainly hasn't been easy.
I put a system in place over the past few weeks to make getting meals on the table a little easier. I relied on my slow cooker a lot. I picked a recipe that would yield enough food for dinner as well as the next day’s lunches – ideally something that will feed about 10 - and used that to keep us nourished throughout the week. On Fridays – three of the past four have been real doozies, the kind that bring urgent phone calls from the hospital – we crashed on the sofa at 9pm with a bottle of red wine, a bag of chips and some store-bought guacamole. Fortunately, the boys are often out with friends this night so we don’t need to worry about feeding them and Matthew is generally happy with scrambled eggs, toast and a smoothie.
On Saturdays, we plan for pizza. If I’m around during the day I make it, thankful for the distracting task of lining rimmed sheet pans with rolled balls of homemade or bakery-bought dough, ensuring there’s enough to feed anyone who’s been at the hospital that afternoon. If I’m also at the hospital, we grab a few pizzas on the way home.
We’ve made a point to be home on Sundays and have been cooking a big meal with and for the boys. Pasta with Bolognese, salad and bread; aromatic curies; beef stroganoff and homemade rolls. And while we've tried to commit to eating healthier in the weeks leading up to Christmas, there's also been cake. Specifically this simple bundt cake that first appeared at Thanksgiving for the pie-haters in the crowd, and is now a staple fall dessert in our house.
I know half the world seems to have their holiday decorations in place already, but we're a little behind on life these days, so I'm still eating like it's fall. We’re not sure what the next few days, weeks or months will bring, but keeping everyone well fed remains top of mind, especially those incredible ICU nurses. Matthew and I have big plans to bake a few batches of cookies this week in attempt to say thank you for taking care of Poppa.
Pumpkin Spice Bundt Cake with Maple Glaze
Serves 10 to 12
For cake:
2 1/2 cups cane or granulated sugar
1 cup canola oil
3 large eggs
3 cups all-purpose flour, plus extra for pan
2 teaspoons baking soda
1 teaspoon ground cinnamon
1 teaspoon ground nutmeg
1/2 teaspoon kosher salt
1/2 teaspoon ground cinnamon
1 3/4 cups pumpkin purée
For glaze:
1 cup powdered sugar
1/4 teaspoon ground cinnamon
1/2 teaspoon pure vanilla extract
1/4 cup pure maple syrup
1. Position a rack in the middle of the oven and preheat oven 350°F. Generously grease and flour a 10-inch bundt pan; set aside.
2. In a large bowl, whisk together sugar and oil until blended. Add the eggs, one at a time, beating well after each addition.
3. In a second bowl, combine flour, baking soda, cinnamon, nutmeg, salt and cinnamon; add to egg mixture alternately with pumpkin, and beating well after each addition.
4. Scrape batter into the prepared pan. Bake for 60 to 65 minutes or until toothpick inserted in the centre comes out clean.
5. While the cake is baking, prepare the glaze by beat glaze ingredients with a whisk until smooth. Add more powdered sugar or maple syrup, if necessary, for desired consistency.
6. Remove cake from oven and cool for 10 minutes before inverting onto a wire rack. Remove pan and cool completely. Place cooled cake on a serving platter or cake stand and spoon glaze over top, letting it drip down sides. Let glaze set at least 15 minutes before serving.
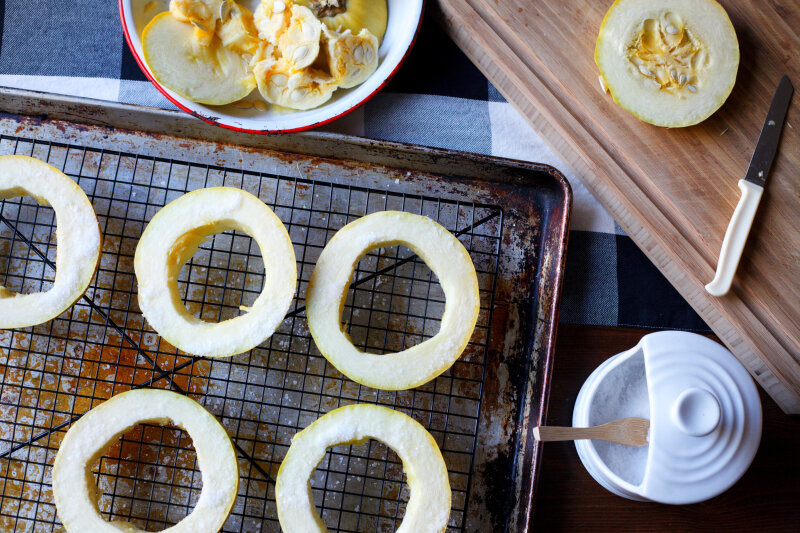
a new way to cook spaghetti sqaush
I didn’t grow up eating squash, and I’m not sure I knew a lot of people who did. We certainly had turnip on the table for almost every holiday meal, but I can’t recall a single time someone cooked squash. Is that strange? Was it an 80s thing? A regional thing? A family thing?
Today, I cook far more squash than turnip simply because I’m convinced I don’t like it, but that’s probably because it wasn’t peppered with much flavour when we consumed it as kids (side note: if you have a great turnip recipe, can you send it to me?). Squash is a different story though, and in my home, I add it to frittatas and salads, serve it as soup, puree it into mac and cheese and even use it in quesadillas.
My go-to for years was butternut squash, but I started branching out and admit I’ve really grown to love spaghetti squash for its pasta-like consistency and versatility.
Do you know to how to cook spaghetti squash?
I totally thought I did, until I came across a new method that was completely game changing. I can’t remember where I first heard or read about it, but just to be clear, this mind-blowing method is not my own discovery but I’m very happy to tell you about it.
Traditionally, to cook spaghetti squash, halve the vegetable lengthwise, scoop out the seeds, drizzle with olive oil and season with salt and pepper. Place the squash halves cut-side down on a baking sheet and roast at 400°F for 45 to 50 minutes. You can still cook your squash this way, and it will turn out, but there really is a better way. Here’s how I currently cook my spaghetti squash:
Preheat oven to 400°F.
Trim the ends from the squash and cut widthwise into 1-inch thick rings. Remove the seeds.
Place the squash pieces on a cooling rack set over a rimmed sheet pan and sprinkle both sides generously with salt (don’t worry, it will be wiped off before cooking).
Let the squash sit for 15 minutes. Wipe off the salt and any water that has accumulated on the sheet pan. Return the squash pieces to the cooling rack and roast for 30 minutes. Cool for 15 minutes.
Peel or cut the skin away, and use a fork to separate the strands into long “noodles.”
So, why the change in cooking method? Halving the squash lenthiwise yields short strands, but cutting it widthwise into rings creates spaghetti length strands instead. In addition, the salting draws out the moisture and leaves the squash crisp instead of mushy. I really dig it, and so do my teenagers.
Here are a few more cooking tips:
Spaghetti squash can be difficult to cut into. If you have a microwave, you can cook it for 2 minutes before slicing into it to make it easier to cut.
Look for squash that’s short and plump instead of long and thin.
The 30-minute cooking time is just a starting point, depending on the size of your squash. Feel free to add an extra 5 to 10 minutes, if you don’t think it’s cooked completely.
To remove the seeds, run a sharp knife around them and they’ll just fall off.

winning weeknight pasta

Many of our meals these days look like the one you see here: a cobbled collection of odds and ends gathered from the fridge late in the day, tossed together to create something that resembles dinner. Often, it works out well and no one around the table knows that I actually didn’t have a plan to make the supper they’re scarfing down.
I think we’ll be eating like this a lot over the summer. Three of us now have job schedules to juggle (hooray for teens who work in the summer!), and life in general is far more chaotic than it’s been in previous years. It’s a season, for sure, and I do feel confident that by the time fall rolls around we’ll be a little more structured. I'm betting many of you feel the same way these days.
I don’t think this needs a formal recipe, but more of a quick rundown of how I made it. The ingredients you’ll need are: 2 pounds pasta + 1/2 cup pesto + 1 container ricotta + 1 1/2 lbs. sausage + all the green veg (head of broccoli, pound of beans, 1/2 bag frozen peas) you can find + plenty of Parm. It’s a meal that serves 8 to 10, which in my house is enough for dinner and lunch leftovers for those packing something to go.
The how to is pretty self-explanatory: cook pasta according to package directions. Mix pesto and ricotta and set aside. Remove casings from sausage, crumble and cook in a skillet. Add all the green veg you can find and sauté until softened. Spoon pesto mixture into drained pasta, add sausage and vegetables and mix. I'm certain you saved some of your pasta cooking water, so toss some of that into the pot as well to help bring it all together. Transfer to a serving bowl and shower with plenty of parmesan cheese.
frozen mango margarita

I love it when Sunday supper coincides with a family party, which is exactly what happened this past weekend when we gathered those nearest and dearest to us to celebrate Ben’s 17th birthday. We were a smaller crowd than usual, having celebrated with one side of the family a few weeks earlier at Easter, but I didn’t mind that much. One of my oldest friends came by, having just returned from a few-week trip to Bali via Hong Kong, and the smaller number of dinner guests meant I had more time to live vicariously through her travels. As someone with a toddler, a teenager with a summer job, and an impending manuscript deadline, I'm beginning to think I won’t be going too far this summer.
Ben requested hipster Mexican for his birthday meal, which I spiffed up enough to call it a casual Mexican feast. The cake was an ice cream concoction, not unlike Jackson’s earlier this year, and while it didn’t suit the theme of the meal at all, the blended drinks certainly did.
I’ve had a version of this frozen mango margarita recipe set aside for years. Literally. It was part of a book proposal that I worked on for a year, before turning my attention to the one that was bought by a bona fide publisher. Seeing as it can’t be made in a skillet or on a sheet pan, and definitely isn’t a one-pan recipe of any sort – though, you do only need one small appliance to pull this off – I’m happy to share it here instead of hoarding it for the future, like I have been.
I really love this drink. It’s healthy, seasonal, colourful and completely thirst-quenching. It’s perfect for passing around to old friends or sipping solo on a weeknight when dinner is nothing more than some chips served with a side of guac. We’ve done that more than once lately. If you have tequila in the cupboard and a bag of frozen mangoes in the freezer, you’ll all set. I’m not a fan of making drinks that require a formal certification in cocktail creation, which should assure you that this really is as easy as it seems.
Frozen Mango Margaritas
I haven't made this with other frozen fruits, but I imagine it would work just as well.
1 lime
3 tablespoons cane sugar, divided
1 bag (10 oz.) frozen mango pieces
1 ½ cups cold water
2/3 cup good tequila
2 tablespoons Triple Sec
1. Zest the lime into a small bowl and stir in two tablespoons of sugar. Set aside.
2. Cut the lime in half and juice it directly into the carafe of a blender. Add the mango pieces, water, tequila, triple sec, and remaining tablespoon of sugar and blend to combine. If you find the mixture to be too thick, add some cold water to thin it to the desired consistency.
3. Run the juiced lime halves over the rims of 4 glasses and dip them in the sugar mixture, coating the rim evenly.
4. Divide the margarita mixture evenly between the glasses and serve immediately.
Serves 4
harissa chicken with potatoes and asparagus

Earlier this year, when I asked you what you want to read about here, the recurring theme was “easy weeknight dinners made in one pot.” I breathed a huge sigh of relief when I saw those words because a) that’s totally my jam these days, too and b) I’m writing a book on the very topic, which confirms I’m on the right track with my work.
For obvious reasons, I can’t dish on all the meals I’ve been creating, but last week I put one together specifically with you in mind. It’s adapted from one my favourite new cookbooks, Dinner: Changing the Game by Melissa Clark, and hits all the hallmarks of a quality family meal. One pan? Check. Healthy? Check. Quick cooking? If you think 40 minutes of mostly hands-off time is quick (I do), then yes, check.
My favourite thing about this dish is that it brings big flavour to the table without intimidating the cook, and can easily be tweaked to cater to the ever-changing taste buds of a toddler. Two-year-olds are nothing if not fickle, especially when it comes to food, and while I really think I have a great eater on my hands, what he likes one day is totally despised the next, so having some flexibility with what I cook is key for me right now.
This meal has so much more going for it than just its adaptability. The spicy harissa-roasted chicken, crisp potatoes, fork-tender asparagus and garlic and herb-infused yogurt bring a brightness to the table that’s been absent since early last fall, and while this dinner is perfectly suited to an average Wednesday night, it easily does double-duty as a meal worthy of serving to your guests. Like all sheet pan suppers, take care not to crowd the pan. The recipe doubles easily (which is what I had to do to feed my family), but requires the use of two pans so you can spread everything out instead of crowding the pieces into one place.
Harissa Chicken with Potatoes and Asparagus
Serves 3 to 4
You can serve this one-pan dinner right on the baking sheet it’s cooked on, or transfer everything to a platter before drizzling with yogurt if you want to be fancy about it. To serve to toddlers, keep some of the chicken and a few pieces of potato separate from the ones tossed with the harissa mixture, and instead drizzle them with olive oil and a small sprinkling of salt and pepper. Bake on the side of the sheet pan beside the spiced meat and potatoes.
1 ½ pounds bone-in, skin-on chicken drumsticks
1 ¼ pounds Yukon gold potatoes, cut into 1-inch chunks
3 teaspoons kosher salt
2 tablespoons harissa
5 tablespoons olive oil
1 pound asparagus spears, ends trimmed and cut into thirds
Zest of 1 scrubbed lemon
½ cup plain Greek yogurt
1 small garlic clove
1 cup parsley and/or dill
1. Combine the chicken and potatoes in a large bowl. In a small bowl, stir together 2 teaspoons of the salt, harissa and 3 tablespoons of the olive oil. Pour over the chicken and potatoes and toss to combine. Let stand at room temperature for 20 minutes.
2. Position a rack in the middle of the oven and preheat to 425°F.
3. In a medium mixing bowl, combine asparagus, lemon zest, ½ teaspoon salt and the remaining olive oil. Set aside.
4. Arrange the chicken and potatoes in a single layer on the sheet pan. Roast for 20 minutes. Flip the potatoes, scatter the asparagus over the pan and roast for another 25 to 30 minutes, or until everything is golden and crisp.
5. While the chicken cooks, place the yogurt in a small bowl. Grate the garlic over the yogurt, mince half the fresh herbs and add to the bowl along with the remaining ½ teaspoon salt. Stir to combine.
6. Remove the chicken from the oven and let cool for five minutes. Spoon the yogurt over the chicken and vegetables and garnish with remaining fresh herbs, tearing them into pieces and sprinkling them over the pan. Drizzle with additional olive oil and fresh lemon juice, if desired. Serve warm.
funfetti biscotti

Matthew turned two on Sunday. Can you believe this sweet little baby is now a curly-haired, chatty toddler? He brings our household so much joy, and to quote my friend Tess, “ He’s like Christmas morning every day!” Unfortunately, this particular version of Christmas still starts around 4 a.m. each morning (every. dang. day.), but it’s pretty hard not to be charmed by his early morning antics, which include making pancakes with Dad, doling out treats to the dog, and watching the first 20 minutes of Shrek on repeat.
We love having him around and despite the behaviours that prove he is indeed a two-year-old, I simply can’t imagine my days without him. It makes me miss the toddler versions of Ben and Jackson fiercely, and I am profoundly aware of how very short these years are as I sit with a diaper-clad son on one side of me, and a University-bound one on the other.
So. Before my eyes get too misty, let me tell you about these little party treats I put together for Matt’s colour-inspired birthday party. After celebrating six family birthdays in just as many weeks, he is incredibly familiar with the two most important elements of turning another year older: presents and cake. He’s particularly fond of the ones that come covered in sprinkles, so I ran with that idea and infused a little funfetti into everything I baked for his special day. These biscotti were a last minute decision, but one I’m really happy to have made. Adding a little white chocolate coating to one side gave them a sweet boost, and made them look a little more celebratory than the undipped version did.
Are you a biscotti fan? I adore the twice-baked, oblong cookies and find they are always a family favourite every time I bake a batch. I like that they (usually) aren’t too sweet and pair perfectly with a cup of coffee or tea. Truth be told, I actually made these for the adults to enjoy with their drinks after dinner, as I thought the funfetti cake and accompanying sweet vanilla frosting might be more appealing to the kids. There are only five pieces left in the cookie jar, so I think my hunch was pretty accurate.
Now that eighty percent of our household has celebrated their 2017 birthday, I’m packing away the piping bags and party supplies for a few months. It’s time to turn my attention back to the hundred plus recipes I’m testing for my next book. I think February and March are great months for hibernating a little, and I’m definitely ready to do just that. With plenty of tea and a few pieces of biscotti in hand, I hope.
Funfetti Biscotti
Makes 28-35 biscotti
6 Tablespoons butter
2/3 cups granulated sugar
1/2 teaspoon kosher salt
1 Tablespoon vanilla extract
1/4 teaspoon almond extract
1 1/2 teaspoons baking powder
2 large eggs
2 cups all-purpose flour
1/2 cup coloured round sprinkles (also known as nonpareils or hundreds & thousands)
10oz. white chocolate, chopped
1. Preheat oven to 350°F and line a 13x18-inch baking sheet with parchment paper.
2. In the bowl of an electric mixer, beat the butter, sugar, salt, extracts and baking powder until the mixture is smooth and creamy. Add the eggs and mix to combine. Don't worry if the batter looks curdled; this is totally normal.
3. Using the lowest speed of your mixer, add the flour, stirring until the dough is smooth and slightly sticky. Fold in the sprinkles using a rubber spatula.
4. Scrape the dough onto the prepared baking sheet. Divide it in half, and shape into two 91/2x2-inch logs. This is easiest to do with dampened or lightly floured hands.
5. Bake for 25 minutes. Remove pan from the oven and reduce the temperature to 325°F. Place the baking sheet on the counter and lightly mist the logs with water. This will slightly soften the crust and make slicing the biscotti much easier.
6. Using a sharp chef's knife or serrated knife cut the logs crosswise into 1/2-inch slices. Lay the pieces flat on the baking sheet and bake for an additional 20 to 25 minutes, or until they feel very dry and the edges are beginning to turn brown.
7. Remove the biscotti from the oven, and transfer them to a rack to cool.
8. Meanwhile, in a heatproof bowl set over a pan of boiling water, melt the chocolate. When the biscotti have cooled, dip pieces halfway in the chocolate, and set on a parchment-lined baking sheet to set.
9. Biscotti can be stored at room temperature for one week; for longer storage, wrap airtight and freeze.
sick day soups

In the week leading up to Rob and Jackson’s birthdays, all four boys in our house fell ill. Rob was the first to succumb to the random virus that left him laid up with a fever for a week, not to mention sinus congestion, a cough and a sore throat. Ben went down next, three days later, with symptoms that mimicked those of his dad, and by the following afternoon both him and Jackson were home from school, curled up in bed with heated blankets. Less than 24 hours later, Matthew woke in the middle of the night, flushed and feverish, clearly having caught whatever it was that infected the other boys in our house.
By some sort of health-giving miracle, I didn’t catch anything from anyone. Instead, I spent the week making pots of soup for those who were sniffly and stuffed up. I tried to pack as many healing ingredients into each, and made both a hot brothy soup and a veggie purée infused with therapeutic aromatics like onion, ginger and garlic.
What I ended up with was a spicy caldo verde for those in need of a little kick, and a soothing roasted carrot and garlic soup spiked with ginger and orange for those who wanted something milder to sip on. Clearly, I was too busy taking care of my ailing loved ones to snap any kind of decent picture of either batch, but thankfully I managed to take a quick iPhone photo for you guys just before I served them to the sickies.
Caldo Verde
Serves 4
1 Tablespoon olive oil
1 Tablespoon butter
1 medium onion, chopped
2 garlic cloves, minced
½ teaspoon red pepper flakes
300g smoked turkey kielbasa, cut into ½-inch thick half moons
1 L chicken stock
1 russet potato, peeled and grated
4 cups stemmed and shredded kale
Salt and pepper, to taste
1. Warm the olive oil and butter in a medium Dutch oven or saucepan over medium heat. Add the onion and cook, stirring often, until softened, about 5 minutes. Add the garlic and red pepper flakes and cook for 30 seconds.
2. Add the sausage to the pot and cook, stirring frequently, until browned, about 5 minutes. Pour in the chicken stock. Bring to a simmer and stir.
3. Using the large holes of a box grater, grate the potato into the stew. Stir well while returning the soup to a simmer. Cover, reduce heat to low, and simmer for 15 minutes.
4. Stir in the kale and cook until it’s tender and wilted, about 10 minutes. Season with salt and pepper, and serve hot.
Roasted Carrot and Garlic Soup
Serves 4
2 lbs. carrots, peeled and cut into ½” thick coins
6 garlic cloves
3 Tablespoons olive oil, divided
Kosher salt
1 tablespoon butter
1 large onion, diced
3 celery stalk, diced
1 one-inch piece fresh ginger, grated
4 cups chicken stock
1 - 400 mL can coconut milk
Juice of 1 medium orange
1. Preheat the oven to 375°F. Place the carrots and garlic cloves on a parchment-lined baking sheet and drizzle with 2 tablespoons of the olive oil. Season with ½ teaspoon salt and toss together until the carrots and garlic are evenly coated with the oil. Roast until tender and slightly blistered, about 45 minutes.
2. Meanwhile, heat the remaining tablespoon of oil and butter in a large Dutch oven or saucepan set over medium heat and cook the onions and celery until softened, about 5 minutes. Add the ginger and cook for an additional minute. When the carrots are cooked, add them to the pot and cover with the chicken stock, coconut milk and orange juice. Stir well.
3. Bring the soup to a boil, cover, lower the heat and simmer for 45 minutes. Purée the soup with an immersion blender (or standard blender) until silky smooth. Return to the stove and set the pot over low to keep warm. Season with additional salt and pepper if desired. Serve warm.
spicy cranberry and soy glazed meatballs

As I wrote on SavvyMom last week, the hustle and bustle of the holiday season doesn’t leave much time for making warm and nourishing meals at the end of a long day, does it? It doesn’t matter how many hours you log at work or in the kitchen baking holiday treats, you’re still left with children, spouses, partners and maybe even parents who need and expect a decent dinner.
How is that even possible? Don’t they know your to-do list is ten things too long right now? Just kidding, of course. But the cold, hard truth is that despite all that’s going on this month, dinner still needs to land on the table sometime between five and six o’clock each night, and ideally it will be made with more than leftover eggnog and broken cookies.
This meal in particular is a good one to keep in your back pocket for the coming weeks. It has many merits, not the least of which is that it allows you the option of making your meatballs from scratch or picking up a package of some quality pre-made ones. The recipe works well in either case, and seeing as we all need a few holiday helpers this time of year, I say go for the frozen ones if that makes getting dinner on the table easier for you.
This dish also takes less than 30 minutes to assemble, giving you enough time to prepare an accompanying whole grain (Brown rice! Quinoa! Couscous!) and one or two green veggies to go with it. Dinner done!
Another thing I should mention about this recipe: it happens to be a modern spin on the classic cocktail meatballs we’ve all made and been served at holiday parties. Only this time the ketchup and grape jelly have been replaced with Thai chilli sauce and cranberry sauce, and spiked with a little soy sauce and clementine juice for balance. So good.
I don’t know about you, but I love recipes that serve a dual purpose and this one can move seamlessly between party fare and family dinner. In other words, it’s definitely worth adding to your meal plan this month.
Saucy Cranberry and Soy-Glazed Meatballs
1 cup Thai sweet chili sauce
½ cup cranberry sauce
½ cup soy sauce
Juice and zest of 2 clementines
1lb. pork, beef, chicken or turkey meatballs (see note)
1. Preheat oven to 400°F.
2. In a small bowl, stir together the chili sauce, cranberry sauce, soy sauce and clementine juice.
3. Place the meatballs in a 9x13-inch baking pan. Pour the marinade over the meatballs and toss to combine. Bake for 20-25 minutes, or until the meatballs are warmed through and the sauce is thickened, stirring once halfway through the cooking time.
4. To serve as a meal, spoon over rice, quinoa or couscous and sprinkle with clementine zest. To serve as an appetizer, place meatballs on the table alongside some toothpicks. Sprinkle with clementine zest and serve hot.
Note: For the meatballs: if using homemade, shape them into 1-inch meatballs and cook until no longer pink before proceeding with the recipe. If using store-bought frozen meatballs, which are generally cooked through, simply prepare the dish as per the recipe instructions.
no-bake s’mores squares

These oversized squares are for eaters of all ages, but we can confirm that it’s usually the adults who swoon at the sight of these s’more-flavoured summer treats. Made in less than 30 minutes with just five ingredients, you won’t find a simpler sweet to make this season. While easy to pack up for a picnic or potluck party, we like the idea of serving them after dinner for a crowd-pleasing dessert the whole gang will fawn over.
No-Bake S’mores Squares
¼ cup butter
1 (400g) bag mini marshmallows
¼ cup cocoa powder
6 cups Golden Grahams cereal
½ cup chocolate chips
Spray an 8-inch square baking pan with cooking spray. Line the pan with parchment paper and then spray the top of the parchment paper lightly. Set aside.
In a large skillet or saucepan melt the butter over medium heat. Add all but 1 cup of the marshmallows and continue to stir until melted. Add the cocoa powder and mix until smooth and combined. Remove skillet from heat and cool marshmallow mixture for 1 minute.
Tip in the cereal, chocolate chips and remaining marshmallows and use a rubber spatula to incorporate. Transfer the mixture to the prepared baking pan and spread evenly. If it’s too sticky you can lightly butter your fingers and use your hands to press the cereal down into the sides of the pan. Chill in the refrigerator for 15 minutes and then cut into squares.
basil parmesan

I’m a fan of simple summer pasta dishes. They are an easy way to use up the abundance of market produce I pile onto the counter and into the fridge, and in less than 20 minutes I can almost always have a meal on the table that will please all the people in my house. From greens, peas, and zucchini to corn, beans, and tomatoes I can’t think of any summer veg that couldn’t be grilled, sautéed, steamed, and/or roasted before being tossed into a pot of olive oil-slicked pasta.
Naturally, I would suggest you add some fresh herbs as well, with basil leading my list of favourite additions by a small margin, and last week I took that thought just a little further and pulsed a small handful of basil leaves I plucked from the garden into a few chunks of Parmesan I cleaned out of the cheese basket. The result was euphoric; how is it that I haven’t thought to do this before?
I recently sprinkled this over a large bowl of rotini tossed with all the green vegetables I could find in my fridge (broccoli, green beans, peas, and kale) and the meat-loving men in my house gave it two thumbs up. I imagine it would add a nice dose of flavour to spaghetti tossed with roasted cherry tomatoes and corn, or penne with zucchini and ricotta.
Basil Parmesan
Makes approx.1 cup
¾ cup Parmesan cheese chunks
¼ - ½ cup fresh basil leaves
Place the cheese and basil in a food processor fitted with a steel blade, and pulse until completely combined and crumbled.

shrimp burgers with old bay mayo

In my books, summer is the season for sandwiches and burgers. Juicy, cheesy beef burgers; barbecued pork burgers topped with coleslaw; turkey burgers smeared with avocado relish; maybe even shrimp burgers dressed up with a coastal-inspired mayonnaise, and fresh vegetables like avocado, tomato, and broccoli sprouts.
The last one in the list above is what I made for dinner last Tuesday night. Jackson was away for the week, and whenever he isn’t around for a day or two we use it as an opportunity to make and eat seafood because he can’t seem to stomach the stuff. In these instances, I usually cook up a side of salmon, but I’ve been eyeing a recipe for shrimp burgers since last summer and used the absence of the shellfish-adverse to make them for those that I knew would enjoy the dinner.
While shrimp and burger are two words that don’t usually get lumped together, trust me when I say you won’t regret making these. Similar in texture to a crab cake, the patties take less than 10 minutes to cook making this an easy weeknight dinner that’s definitely impressive enough to serve to your weekend guests. I’m already hatching a plan to put them on the menu again, and think it might be wise to serve them with a charred corn salad.
Oh, and that mayo mixture I mentioned at the beginning of the post? You’d want to slather it over everything you make in the coming weeks, it really is that good.
Shrimp Burgers with Old Bay Mayo
Makes 4
For the mayo:
½ cup mayonnaise
1 Tbsp. Old Bay seasoning
For the burgers:
400g medium shrimp, peeled and deveined
1 large egg, lightly beaten
2/3 cups panko breadcrumbs
2 green onions, thinly sliced (white and light green parts only)
1 Tbsp. fresh lemon juice
½ tsp. kosher salt
¼ tsp. garlic powder
¼ cup safflower oil
4 hamburger buns, lightly toasted
Lettuce leaves
1 tomato, sliced
1 ripe avocado, sliced
Broccoli sprouts
1. To make the mayo, in a small bowl whisk together the mayonnaise and Old Bay seasoning to combine. Refrigerate until needed.
2. To make the burgers, place half the shrimp in the bowl of a food processor and add the egg, panko, green onion, lemon juice, salt, and garlic powder. Pulse until smooth. Add the remaining shrimp to the bowl and pulse a few times until it’s coarsely chopped. Refrigerate for 10 minutes. Using damp hands, shape the shrimp mixture into four patties.
3. Heat the oil in a large skillet over medium-high heat. Add the patties and cook for 3-4 minutes per side, or until this shrimp is opaque throughout.
4. Spread the buns with the mayo mixture, add the burger and top with lettuce, tomato, avocado, and broccoli sprouts. Serve immediately.
Only slightly adapted from Endless Summer by Katie Lee
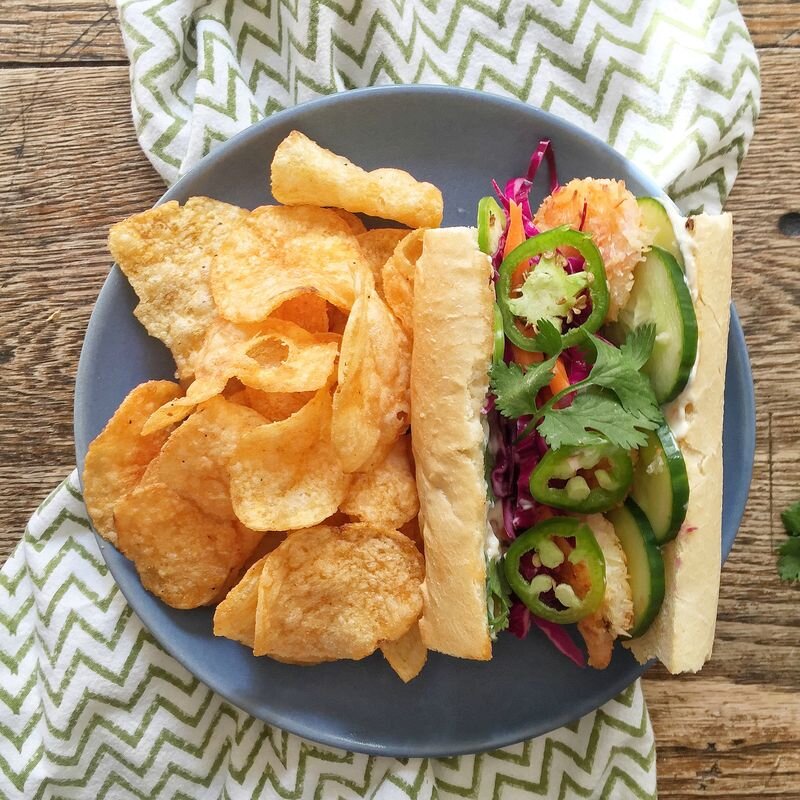
shrimp banh-mi
By now, you probably know that Rob and I have an at-home date night once a week. It’s something we’ve been doing since the summer of 2000 when three-month-old Ben left us feeling a little desperate for some adult-only time, despite how enamoured we were with him. By the time Jackson came along, those precious few hours we carved out for each other every week were practically required in order to keep our sanity intact with two kids under two, and now that we live with two teenagers and a toddler you can only imagine how much we look forward to our time together on Thursday nights.
Despite our enthusiasm, these days our dates see a little less cooking than they used to, and instead of prepping a meal for each other we either a) drink beer and eat pizza or b) drink wine and eat cheese, in front of whatever Netflix show we’ve deemed binge-worthy that week. To be honest, we also use the night as a way to rest up for the weekend, as we get very little sleep between when we wake up Friday morning and when we finally get to bed on Sunday night. Our teenagers are quite social and we either have kids over until midnight or thereabouts on Friday and/or Saturday nights, or we’re picking up the boys from their friends’ houses around midnight (or thereabouts) on Friday and/or Saturday nights. We also have a baby who rises with the birds, so it’s not uncommon for us to be curled up with him, a warm bottle of milk and the Mother Goose Club between 4:30 - 5:00am. If you do the math, we really don’t sleep for more than a few hours each night and fully admit that right now, in this life stage, the weekends are kicking our you-know-whats just a little.
A few weeks ago I decided that I really didn’t want date night to become code for “let’s be lazy “ so I tucked Matthew into bed and returned to the kitchen to turn a bag of frozen shrimp into a dinner we can’t stop talking about. We’ve made it twice in as many weeks and have declared it our new favourite, something we do every three months or so if you’re paying close attention. I even made a version of the sandwich for Ben last week while Jackson was out at an eighth-grade graduation party, and he whole-heartedly endorsed the dish, so you can assume that with a few tweaks if necessary this is something that could probably work on your family dinner table this summer.
Shrimp Banh Mi
Although we suggest that this makes 4 sandwiches, we're also confident that if each sandwich was cut into three pieces this would make an awesome pre-dinner nibble or party snack.
Makes 4 sandwiches
For the cabbage and carrots:
3 Tbsp. rice wine vinegar
1 tsp. sugar
½ tsp. salt
½ small red cabbage, shredded
10 baby carrots, cut into matchsticks
For the basil mayonnaise:
½ cup mayonnaise
1 small garlic clove, minced
Juice of 1 lime
4 basil leaves, sliced into thin ribbons
For the shrimp:
1/3 cup cornstarch
1 egg
1 Tbsp. water
2 cups unsweetened flaked coconut
Kosher salt
2 Tbsp. olive oil
1 lb. shrimp, peeled and deveined
For the sandwiches:
1 baguette, cut into 4 equal pieces
½ English cucumber, thinly sliced
1 jalapeño pepper, thinly sliced
Fresh cilantro leaves
1. To make the cabbage and carrots: In a medium bowl whisk together the vinegar, sugar and salt. Add the cabbage and carrots and toss to combine.
2. To make the basil mayonnaise: In a small bowl, combine the mayonnaise, garlic, lime juice and basil. Stir to combine.
3. To make the shrimp: Place the cornstarch in a small cereal bowl, beat the egg and water together in a second bowl, and dump the coconut into a third bowl. Season each bowl with salt to taste, and stir to combine. Heat the oil over medium-high heat until it's hot and shimmering. Dredge the shrimp in the cornstarch, dip it in the egg, and coat all sides with the coconut. Fry until golden brown, about one and half minutes per side. Repeat with the remaining shrimp, and place them on a paper towel lined plate when cooked.
4. To assemble the sandwiches: Preheat oven to 350°F and slice baguette pieces in half lengthwise (don’t cut all the way through). Place on baking sheet and toast until golden brown, 3-5 minutes. Spread two tablespoons of the basil mayonnaise on each piece of bread and divide the cucumber evenly among the sandwiches, layering it on top of the mayonnaise. Add a quarter of the cooked shrimp to each sandwich, top with an equal amount of cabbage and carrots, and garnish with jalapeño slices and fresh cilantro.
Note: These would also be great made with toasted hot dog buns.
whole wheat chocolate chip cookies

These cookies have been made, baked, and eaten no less than ten times in the past two months in our house. Here are five things we really love about them:
1. They are made solely with whole wheat flour. I get these are still cookies that contain butter, sugar and chocolate, but somehow I feel a little more virtuous handing them out to the kids because the whole grain game is pretty strong here. Also, I like the nutty flavour it adds to the taste, so there’s that, too.
2. They can be made with cold butter! If like me, you often forget to bring your butter to room temperature before you decide to bake a batch of cookies, this is the recipe for you.
3. I’ve reduced the sugar by twenty-five percent and they still taste amazing.
4. The next month is almost always a busy one for parents everywhere. These cookies can be your contribution to any potlucks or picnics you’re invited to, they can be sold at a bake sale, taken to a class party, passed around post-soccer or baseball practice, and/or packaged up in a clear cello bag for a tasty teacher’s gift.
5. They make really great ice cream sandwiches.
Whole Wheat Chocolate Chip Cookies
Adapted from Kim Boyce via Genius Recipes.
Makes 20-24 cookies
3 cups whole wheat flour
1 1/2 teaspoons baking powder
1 teaspoon baking soda
1 1/2 teaspoons kosher salt
1 cup cold butter, cut into 1/2-inch cubes
1 cup packed dark brown sugar
1/2 cup evaporated cane or granulated sugar
2 large eggs
1 Tbsp. vanilla extract
1 1/2 cup chocolate chips
1. Place oven racks in the upper and lower thirds of the oven and preheat to 350°F. Line two large rimmed baking sheets with parchment paper and set aside.
2. Combine the flour, baking powder, baking soda and salt in a mixing bowl and set aside.
3. Place the butter and sugars in the bowl of an electric mixer and cream together on the lowest speed just until blended, about 2 minutes. Add the eggs, one at time, mixing well between each addition. Scrape down the sides of the bowl, add the vanilla and mix.
4. Slowly add in the flour mixture, blending until just combined. Remove the bowl from the mixer, pour in the chocolate chips, and stir with a spatula.
5. Scoop mounds of dough (about 3 tbsp. worth - I use this cookie scoop to portion) onto the prepared cookie sheets, leaving 2-3 inches between them.
6. Bake for 16 (soft cookies) to 18 (crisp cookies) minutes. Remove from the oven and transfer to the counter to cool on the baking sheet. Cookies are best eaten warm or later the same day, but will hold up in an airtight container for up to 3 days.
lasagna soup

Researchers at the University of Michigan have discovered that cheese can produce feelings of euphoria, not unlike the ones associated with hard drug addiction. This might explain why I’m currently obsessed with this soup. At first glance, it looks like a bowl of not much to brag about; pieces of penne pasta bathing in a tomato-y broth alongside ingredients that roughly resemble beef bolognese. Essentially, that’s exactly what it is, but what you can’t see is the magical blanket of fresh mozzarella laying on the bottom of the bowl. The one that becomes warm and melty, and infuses each bite with gooey cheese that stretches effortlessly from bowl to mouth.
As is the case with most of the meals in our house, we all ate our bowls of soup a little differently. My beloved Ben isn’t as pathologically obsessed with cheese as the rest of us (honestly, he hates the stuff unless it’s on pizza) so he ate his soup as is. Matthew munched on noodles, chunks of cheese, some of the veggies and a bit of broth, while the rest of us ate it the way it’s meant to be served. It was also dished up on a night when we were eating at different times, so I prepped the soup portion of the meal early in the day, cooked the pasta separately and tossed it with olive oil to prevent sticking, and then kept it at room temperature until it was time to eat. When we were ready, the mozzarella slices were placed in the bowl, a large handful of pasta scattered over top, and hot brothy soup ladled in to fill the bowls.
For a twist on your typical meat sauce, I started the recipe with seasoned sausage squeezed from the casings. Not only is this one of my favourite recipe shortcuts, it’s also a guaranteed way to add good, deep flavour without too many ingredients. To it, I added onions, carrots, celery and garlic, and simmered everything in some store-bought marinara (use homemade if you have it!). Finally, four cups of chicken stock were tipped into the pot, creating a rich base to spoon over the noodles and cheese.
I used penne because that’s what I had in my pantry, but if you can find it I think mafalda pasta, with its ribboned sides that closely mirror traditional lasagna noodles, would be a better option. There’s also nothing to say that you couldn’t break up those ordinary lasagna noodles into smaller pieces and use them instead. Lastly, do not be afraid to spoon a dollop of pesto or fresh ricotta on top of this soup; the result will be nothing but moan-worthy.
Lasagna Soup
Serves 4 - 6
1 Tbsp. olive oil
1 lb. Italian sausage (mild or hot), casings removed
1 medium onion, chopped
3 small carrots, diced
2 celery stalks, diced
1 garlic clove, minced
3 cup marinara sauce
4 cups chicken broth
450 g penne pasta
Fresh mozzarella cheese
Parmesan cheese
Optional: ricotta cheese, pesto, fresh spinach
1. In a Dutch oven or medium saucepan, heat the oil over medium to medium-high heat. Add the sausage and brown, crumbling it with the back of a wooden spoon.
2. Add the onions, carrots, celery and garlic and cook until soft, about 10 minutes. Stir in the marinara sauce, reduce the heat slightly and simmer for 20 minutes, stirring occasionally.
3. Add the chicken stock, bring to a boil, reduce heat and simmer for another 10 minutes.
4. Meanwhile, cook the pasta according to package directions and drain well.
5. To serve the soup, lay slices of fresh mozzarella (as many as you like) on the bottom of the bowl and top with 3/4 cup of cooked pasta. Ladle the hot soup over top, filling the bowl. Garnish with parmesan cheese and serve.
Notes:
Make the soup portion of the recipe on the weekend and tuck it into the fridge or freezer for a future weeknight meal. When you’re ready to eat it, cook some pasta, heat the soup and you’ll have dinner on the table in less than 15 minutes.
mexican macaroni

I feel confident that every family has a “fright night.” You know, the one that sees three people heading in four different directions, with dinner happening at various times for all involved. Our wildcard weekday is Thursday, and it looks a little something like this:
Kid A works this night and needs to leave the house by 4:45 p.m. Kid B has basketball practice after school and doesn’t get home until 4:40 p.m. Kid A would like to eat something before he leaves, but prefers to have a heartier dinner when he’s home at 8:00 p.m. (translation: he needs two dinners). I drive Kid A and a friend to work, and also pick them up, so in between I head to a Starbucks where I treat myself to a sweet and steamy hot chocolate and work (uninterrupted!) for 2 ½ gloriously quiet hours.
Rob holds down the fort at home, feeding Kid B and the baby the dinner I make for the boys at 4 p.m. He eats a bit himself just to tied himself over until I get home, because Thursday night is our new date night (translation: dinner on the sofa with a glass of wine and mind-numbing TV before heading to bed early because the littlest person in our house, who usually wakes up at 4am, has taken to being up between 2:30 a.m. – 5:00 a.m. and we can’t function if we don’t get to bed before the nightly news begins).
We take turns planning our dinner dates, as we don’t eat the same thing as the boys, and usually have wine and cheese, wine and dessert, or wine and pizza. The brilliance in this plan is that I make sure to cook something for dinner that yields hearty portions, resulting in a lot of leftovers for the next day’s lunches.
When I get home with Kid A, the babe is in bed, Kid B is usually done his homework and chores and is chilling for the night, Kid A eats his (second) dinner before starting his homework, and we have that well-deserved date night. On days like this, when you need a people-pleasing 30-minute meal that yields lots of leftovers, this Mexican macaroni will definitely save your night. You can use the ground meat of your choice - sometimes I opt for pork, or turkey, or even beef depending on what's available in the freezer - and when added to whole grain pasta and beans it's a meal I feel really good about serving. Plop some green vegetables on the plate, too, and maybe even a salad, and you have a dinner that's destined for your back-pocket recipe repertoire.
Peace out, Thursday.
Mexican Macaroni
Serves 4-6
1 Tbsp. canola/sunflower oil
½ onion, diced
1 lb. ground meat (beef/pork/turkey/chicken)
3 cups tomato sauce
1 – 19oz. can black beans, drained and rinsed
1 Tbsp. chilli powder
1 teaspoon ground cumin
1 teaspoon dried oregano
Kosher salt
1 lb. whole-wheat macaroni
1 ½ cups grated cheddar cheese
Heat the oil in a large skillet (12-inches would be best) set over medium heat. Cook until softened, about 5 minutes.
Add the ground meat, breaking it up with the back of wooden spoon, and cook until no longer pink.
Add the tomato sauce, black beans, chilli powder, cumin, and oregano, and season generously with salt. Bring to a boil, reduce the heat and simmer for 20 minutes or until the sauce has thickened.
Meanwhile, bring a large pot of salted water to a boil and cook the pasta according to the pasta directions.
When cooked, reserve ½ cup of the cooking water, drain pasta and add it to the skillet. Toss until well combined; add some of the reserved water if the sauce is too thick. Sprinkle with grated cheese and stir until the cheese melts into the sauce and becomes slightly gooey. Serve warm.
pasta with yogurt and caramelized onions

Pasta with yogurt and caramelized onions is sophisticated yet simple, striking enough for company, and reminds me of an Alfredo sauce that’s lighter, leaner, and better thanks to the hefty garnish of caramelized onions and Parmesan cheese.
Pasta with Yogurt and Caramelized Onions
Seves 4
4 good glugs of olive oil
5 yellow onions, thinly sliced
Kosher salt
1 pound fresh fettuccine, tagliatelle or other long pasta
2 cups Greek yogurt
1 cup grated Parmesan
Optional: chopped parsley or chives
1. Heat the olive oil in a large skillet over medium-high heat and add the onions. Reduce the heat to medium low and cook, stirring frequently, until the onions are soft and golden brown, 30-40 minutes.
2. Meanwhile, cook your pasta in a large pot of salted water. Drain and reserve ½ cup of the pasta water.
3. In the same pot, whisk together the Greek yogurt with the pasta water, starting with ¼ cup and adding more, as needed, to reach desired thickness. Toss pasta with the yogurt mixture. Transfer to a large platter or bowl, sprinkle with the Parmesan cheese and top with onions. Garnish with fresh chopped parsley or chives, if desired.
Adapted from Amanda Hesser, The New York Times and Food52’s Genius Recipes